Computer Not Loading Bios Continually Restarting


BIOS is an important part of every motherboard as it enables users in troubleshooting their computers. As an acronym, it means the Basic Input Output System. BIOS helps you in booting your computer so if it has a problem and you are stuck on its screen, then you need help and you need it fast. This is because if you cannot move on from the BIOS screen, then you simply cannot do anything else on your system since you have to move from there to boot your computer.
But there is a way. This article will show you ways you can resolve this issue so pay careful attention.
- What to Do if PC is Stuck on BIOS Screen?
- Recover Data When PC is Stuck on BIOS Screen
What to Do If PC Is Stuck on BIOS Screen?
Going straight to the essence of this article, learn what to do if your PC gets stuck on the BIOS screen by following the methods explained below:
- 1. Restore Default Settings of BIOS
- 2. Clear the CMOS (BIOS)
- 3.Use UEFI Boot and Check Your Boot Order
- 4. Repairing Computer Using Windows 10 Bootable Media
1. Restore Default Settings of BIOS
First, you need to access BIOS settings before your reset it. Follow the steps below to do these:
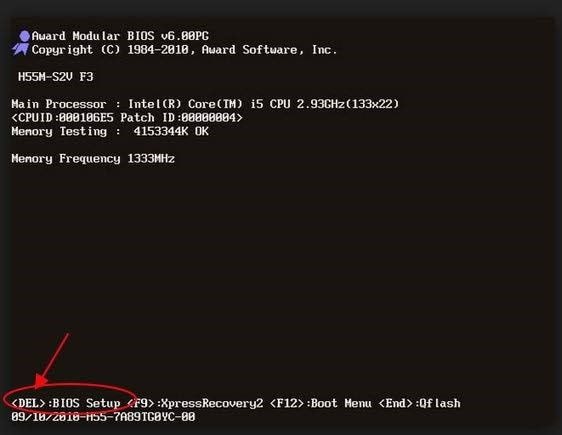
- Boot your computer and while it is still loading, continually press the key that will lead you to BIOS. On the screen, you may get hints on the exact key to press, which is mostly "F2", though it's "DEL" for some laptops. Whichever one it is; your computer will load the BIOS settings when you hit the right key enough times.
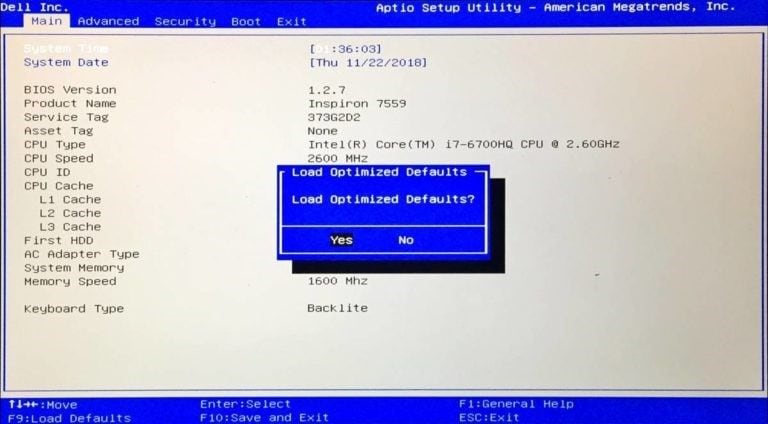
- Now that you are in, launch the prompt "Load Default Options" by hitting the key F9. To confirm the restoration of your BIOS default settings, click "Yes".
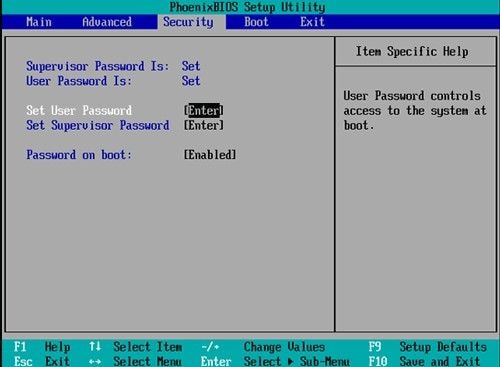
- You can also go to the "Security" button and reset your BIOS there. Although the menu options are different for different motherboards, there will always be one option on the list for BIOS reset.
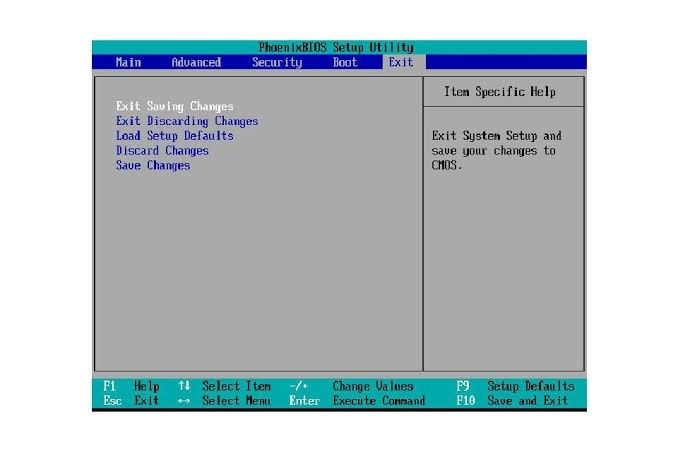
- Click to "Save" > "Exit".
2. Clear the CMOS (BIOS)
The essence of clearing your motherboard's CMOS battery is to reset your BIOS to factory settings. The steps to do this are outlined as follows:
- Put off any device that is externally attached to your computer.
- Disconnect the power cord of the computer system from its AC power source.
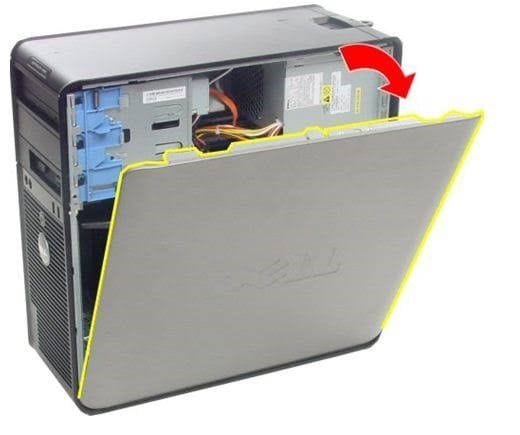
- Remove the case cover of the computer.
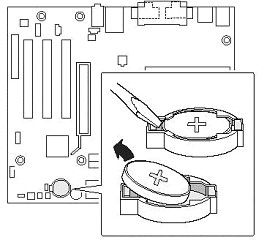
- Locate the motherboard's CMOS battery. You can find the battery in a vertical/horizontal battery holder on the motherboard. Alternatively, you can see it connected via a wire to an installed onboard header.
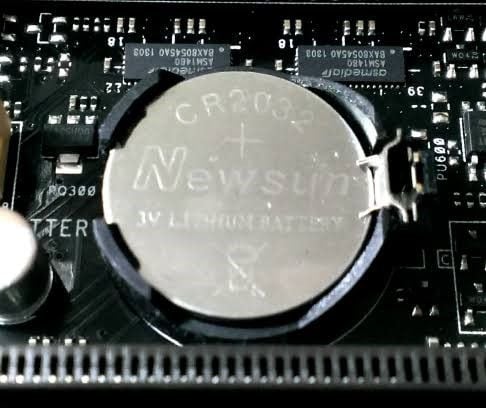
- Now, remove the battery and if it is in a holder, take note of its – and + orientation. Take your time to pry the battery-free from what's connecting it. If it is connected by a wire, disconnect the wire.
- Hold on for a minute to five before reinserting the battery into the motherboard.
- Cover back the computer with its case cover.
- Plug back every peripheral device you initially detached from the computer.
- Power on your PC.
3. Use UEFI Boot and Check Your Boot Order
The more recent versions of computer systems have replaced BIOS with UEFI. UEFI means Unified Extensible Firmware Interface. This replacement is because UEFI is faster than BIOS and its security features are better improved than BIOS. Thus, it makes sense that one of the ways you can fix the issue of PC being stuck on the BIOS screen is to use UEFI to check your boot order.
Now to do this, go to BIOS as shown in solution (1) above, then do the following:
- Scroll to the section for "Boot" and tap to enable the "UEFI boot" option.
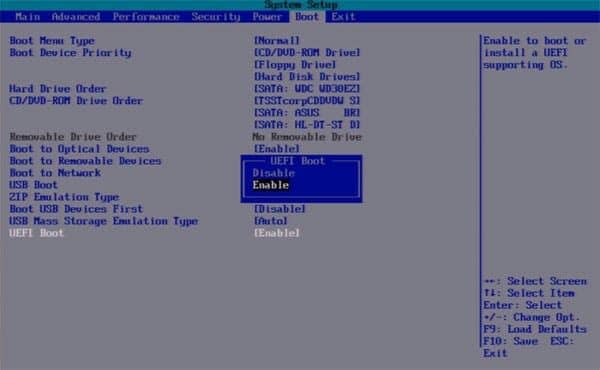
- Check your boot order. Set your SSD or hard drive as the device to first boot. Then press "Enter".

- Now restart your computer.
4. Repairing Computer Using Windows 10 Bootable Media
To use a DVD media or a bootable installation USB to repair or boot your computer, follow the steps below and do advanced troubleshooting:
Step 1: Download the ISO Version of Your Windows:
Download the same ISO version of Windows as the one installed on your PC. Note that this is not compulsory but it can become useful when you need to do a fresh installation of Windows. ISO file of your Windows version helps keep the store of all the setup files you may need for this fresh Windows installation.
Step 2: Create the DVD Drive or a Bootable USB
Use any of the available tools online to create a bootable thumb drive. Although not specifically a tool for creating bootable USB, a recovery tool like Recoverit Data Recovery helps you create bootable USB before you can recover your files from a computer stuck on the BIOS screen. The use of this tool will be outlined in detail in the next section of the article.
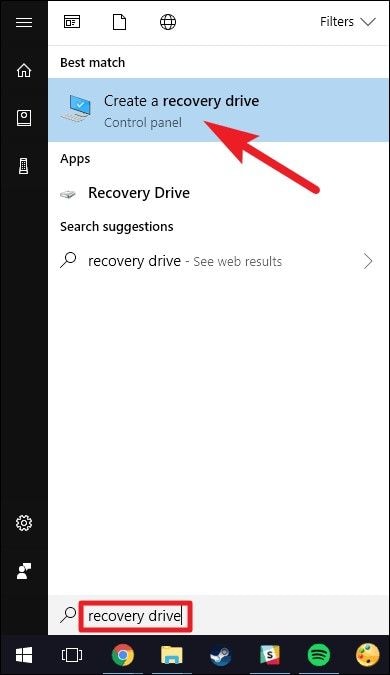
You can also create a repair bootable USB on a working computer using these steps:
- Connect the USB drive to the working computer; check that it is detected.
- Go to the search box and input "recovery drive", then select the option "Create a recovery drive"
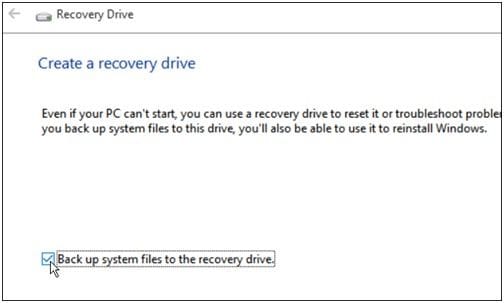
- Check the box beside the instruction "Backup system files to the recovery drive". Move on to the next window.
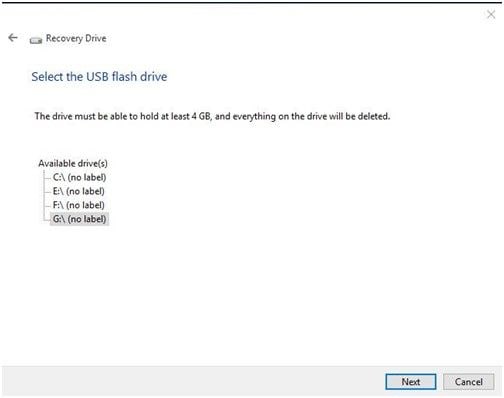
- Choose a USB thumb drive and again select "Next".
- Begin the operation by selecting "Create"

Boot into your PC's UEFI or BIOS and arrange the boot order so that the USB will come first, then the hard disk.
Step 3: Boot from the Bootable Media and Repair Your Computer
Boot your computer from the bootable media you have created. It will begin a process of Windows 10 installation but do not click on "Next" to continue as this will only end up with you installing another Windows OS. Instead, what you should do is go to the bottom of the screen and choose "Repair your computer" to move to the Advanced Recovery proper.

Step 4: Perform Advanced Recovery Troubleshooting
This step consists of the following:
- Click the "Advanced options" button.
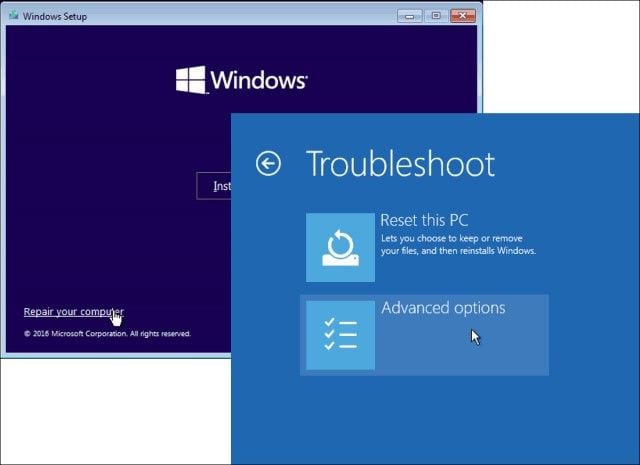
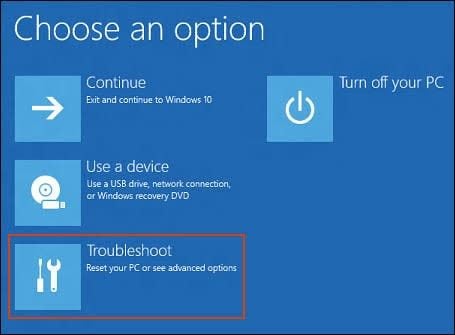
- Move to click "Troubleshoot".
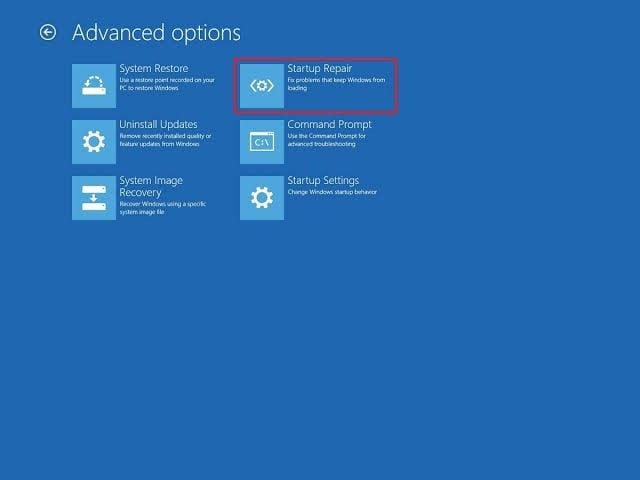
- Select "Startup Repair" from the list of options in the "Advanced options" window. A set of instructions will guide you in fixing the problems which prevent you from booting your computer; ensure you follow them.
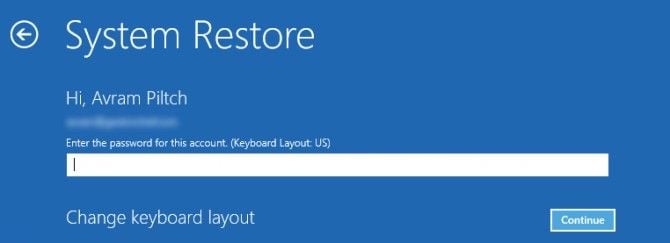
- Next, a screen will pop up with your admin account name.

- Click on this account and make a verification that the account is yours by inputting the password associated with its email.
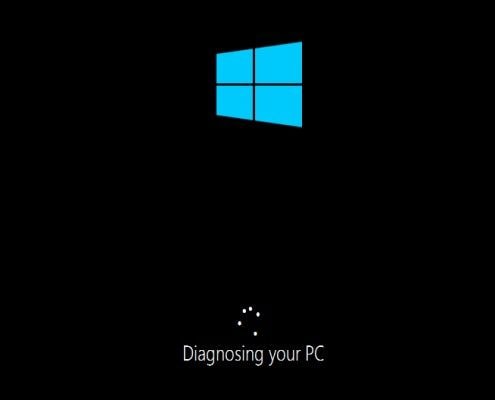
- Once the above is done, your computer will go through diagnosis and any problem related to its booting will be resolved.
- Now you can restart your computer, knowing it will properly and not get stuck on the BIOS screen.
Recover Data When PC is Stuck on BIOS Screen
When your PC gets stuck on the BIOS screen and you urgently need some important data from the system, there is a way you can access them; consult the software Recoverit Data Recovery. This tool can recover data from crashed systems, corrupted SD cards, formatted drives, damaged internal hard drives, etc.
The tool's interface is user-friendly and even if you are an amateur user, you can easily use it. Therefore, follow the steps below and recover data from your PC if it is stuck on the BIOS screen:
Step 1 – Create Bootable Media
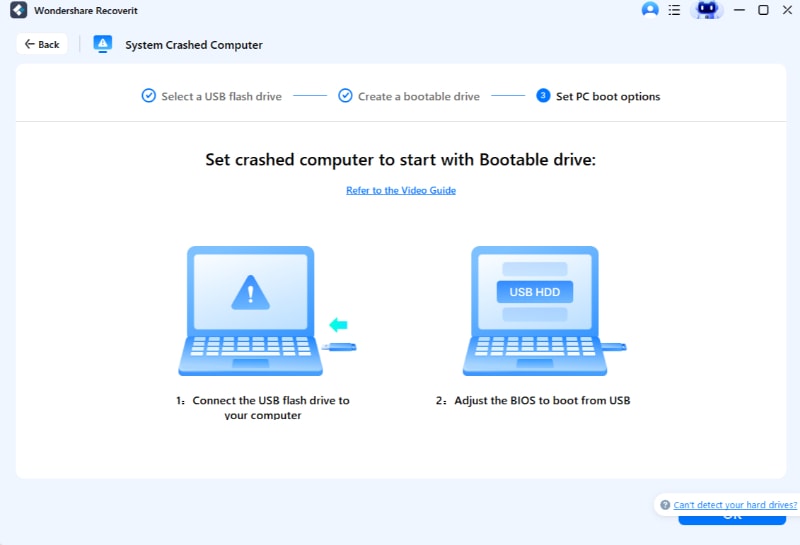
You need another computer that works fine, to begin with. So, plug either the DVD/CD or USB you used in solution (4) above into this working computer. Creating bootable media as this will help you gain access to your drive so that Recoverit can help you retrieve your data.
Once the CD/DVD or USB is plugged in, download and install Recoverit Data Recovery. Select the option to "Recover from Crash Computer" under the tab "Advanced Recovery", then select "Start".

The next window is where you get to create the bootable media. Depending on which device you are using, choose CD/DVD or USB, then click "Create". If you have chosen a USB, you will be prompted to format it. Click "Format" > "Create".

In the next window, Recoverit will download the needed firmware for creating the bootable media. Then, it will format your drive before finally creating the bootable media. Once this is completed, you will be notified. Eject your DVD/CD or unplug your USB, as the case may be.
Step 2 – Boot Computer with Bootable media
Go to the BIOS settings of the computer that's stuck on the BIOS screen. Change the boot order to let the computer from a USB drive or CD/DVD. Insert the DVD/CD into the problematic PC or plug in the bootable USB into it.
Reboot your faulty computer; you will now be able to gain access. Also, plugin an external drive that you can use as storage for the data you are about to recover.

Step 3 – Select Recovery Mode
Two options of recovery mode will be presented to you: "Data Recovery" and "Hard Disk Copy". Choose "Data Recovery" mode. Go to the drive where you originally stored your files and select them. Once you choose to "Start", Recoverit will scan the drive and retrieve all your files.
Step 4 – Recover and Save
You can preview your files even as they are getting retrieved, one after the other. Once the scanning is over and all your data have been retrieved, select the external drive you plugged in step (2) above as the location where you wish to save your files.
Select "Recover" and your retrieved data will be saved in the drive.
The Bottom Line
You can no longer be stuck on the BIOS screen when booting your computer because now you know what to do if confronted with such a situation. All of the steps that have been outlined are practical and easy-to-follow. Do not forget to use the professional Recoverit Data Recovery if you are in a hurry to use data from a PC stuck on the BIOS screen.
You can explore more from Wondershare Video Community.
Source: https://recoverit.wondershare.com/computer-problems/pc-is-stuck-on-bios-screen.html
Postar um comentário for "Computer Not Loading Bios Continually Restarting"